

Axure Tutorial: Team Project and Team Library
Introduction
This article is a part of course Axure Full Course: Tutorial, Tips and Templates.
If your team has more than one person editing the Axure prototype, you can create and use the Axure team project/library, which allows multiple people to manage a prototype file. This saves the work of passing a prototype file back and forth, and may also cause version conflicts.
Team project is a shared project, and Team library is a shared widget library.
Create team project and team library
Click File>New Team Project or File>New Team Library on the menu bar to create a new Team Project or Team Library.

You can choose to create on Axure Cloud or on your own server, and then choose the file path.

Once created, you can save a local copy for editing.

Then you can invite co-authors via email (Invite Users), or copy the URL in Axure Cloud(Make URL Public) and invite co-authors.

Click Open Team Project File to enter the team project.
Workspace Team Management
If you invite teammates to join the project team, you will see them in the workspace.
You can delete them, or change their level.

Use Team Library via Axure Cloud
If you create a Team Library, you can load it directly in the widget library. The one with the cloud icon may be the team Library.
Note: You can use widget library via Axure cloud without creating team library.

Getting a Copy of an Existing Team Project
After you have accepted someone's invitation, or created a team project/library yourself, you can get a copy of the Team project via File > Get and Open Team Project in the menu bar.

Working with Team Projects
Because there may be multiple co-authors editing files together, in order to ensure that file versions do not conflict, Team Project uses the project's Check out and Check in methods to manage file editing.
When a co-author checked out one or more pages/components/generator, other co-authors generally cannot edit these pages/components/generator; when a co-author checked in one or more pages, other co-authors can edit these pages.
Check Out Pages
After you checked out pages, you will get the latest copy of these pages from the cloud for your editing.
To Check out pages, click the blue dot on the right side of the page and select Check Out.
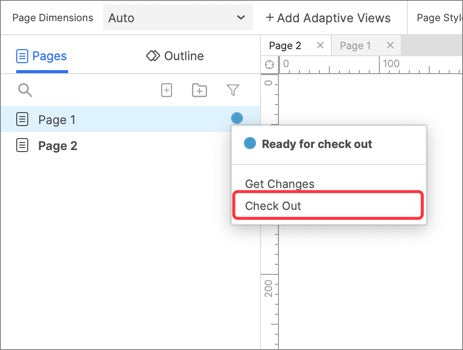
If you only want to get the changes from the Axure Cloud without checking out the page, select Get Changes.
If you want to check out all pages, click Team > Check Out Everything in the menu bar.

Check In Pages
Only if the Co-author checked in, others can edit these Checked out pages.
To Check in pages, click the + button on the right side of the page and select Check in.
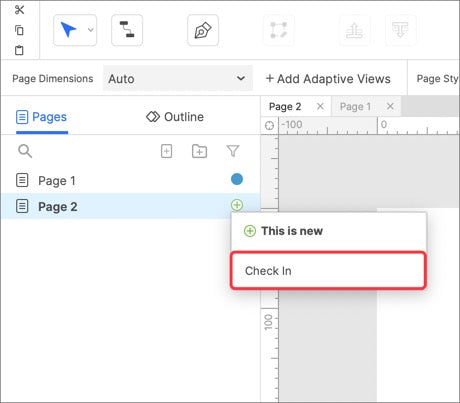
If you want to check in all pages, click Team > Check In Everything in the menu bar.
Unsafe Check-Outs
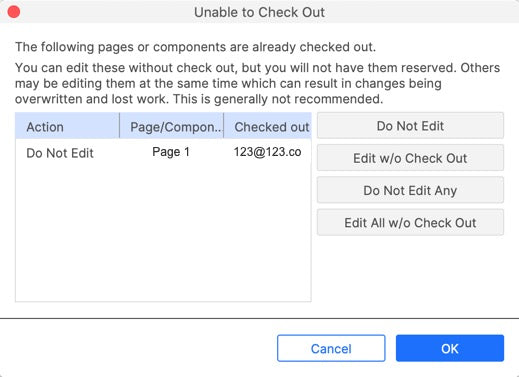
If you want to check out items that are checked out by other co-authors, you will see an Unable to Check Out window.
If you select the Edit w/o Check Out option, you can unsafe check out these items.
Steal Check Out
If you unsafe checked out the items, after modification, check in, the Steal Check Outs window will appear, you can Steal Check Out.

Sending Changes without Checking In
If you want to send changes to the cloud without checking in to keep the checked out state. You can click Team>Send All Changes in the menu bar.

That's all for today's lesson. If you have any questions and suggestions, please leave a message.
If you like the article, please share it with others with page link, thanks for your supporting! ❤
Well Joe @AxureBoutique, a technical writer and teacher, focuses on Axure prototype design and product design.


@Lynell Crowley
Thank you for your support!
Hi axureboutique.com webmaster, Your posts are always well-written and easy to understand.
Leave a comment