

Axure Tutorial: Make Heat Map with Repeater
Introduction
Heat maps are commonly used statistical charts in visual interfaces, so today we will learn how to make heat maps in Axure.
We will use the repeater to make it, because the repeater has high reusability. When it is used again, it only needs to fill in the data in the table, which can automatically generate the interactive effect, including automatically displaying the corresponding color according to the data and displaying the hint info in the title when mouse enter. The specific effect is shown in the image below:

Features to be Realized
1. Automatically change the color of the heat map according to the data in the repeater table.
2. When the mouse enter the cell of the heat map, a related notice is shown.
How to Realize these Features
1. Make different states of the cell through the dynamic panel, and the colors of different states are different.
2. When the cell is loaded, change the state of the cell according to the repeater data and the name of the cell.
Widgets Setup
1. Tabular cell

1. Create a tabular cell through the dynamic panel with rectangle and create five states, each with different colors.
2. Then we need to name the rectangle of each color, which is important here, because we can get the name through the name function later. We fill in the maximum value of the interval in the name, and then we can automatically calculate according to the name through interaction to realize the effect of automatic color change. For example, if the range of the yellow rectangle is 200, it will be named 200; Orange is 200 to 400, which is named 4000.
2. Legend

The legend is simply made of label + rectangle. The rectangle is filled with color, and the text label behind is the value range corresponding to each color. It is shown in the figure below.
3. Hint Panel
The hint panel consists of a title and two text labels. The bottom background rectangle is added with a shadow effect. The left is the title, which corresponds to the x-axis, and the right is the data text, which corresponds to the y-axis and specific data. This panel is hidden by default.

Interactions Setup
1. Set cell text

We need to use the interaction of setting text to transfer the values in the repeater table to the corresponding widget in the repeater, so as to show the data.
2. Set the panel state
Setting the panel state is actually setting a specific color, because different colors are set for different states in the dynamic panel. So we use the interaction that sets the state of the panel to show the corresponding color. Let's take the first dynamic panel as an example, we need to perform the following interaction:

Condition 1: If Item.Column1<LVAR1.name, Item.Column1 is only the data of the first column in the repeater, LVAR1.name is the component name of the variable LVAR1, where LVAR1 corresponds to the first label (yellow label 0-200), because we named it 200 earlier, the meaning here is actually if the data in the first column is less than the table row of 200. We will set the dynamic panel to state1 (yellow).
Condition 2: If Item.Column1<LVAR1.name, this is basically the same as Condition 1, but the variable of LVAR1 is different, where LVAR1 represents the second label (orange label), we named the orange label 400 earlier, so we generally use The interaction that sets the state of the panel sets the dynamic panel to state2 (orange), i.e. orange as long as it is below 4000.
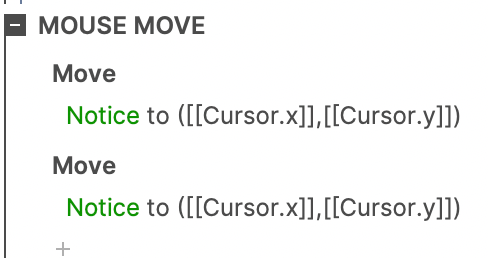
3. Mouse over cell interaction
There are three situations here: when the mouse moves enter, when the mouse moves move, and when the mouse moves out. Let's take the cell 1 in the repeater as an example.


Finally, we need to set up the interaction when the page mouse moves. Why not directly set the interaction when the mouse leave of the cell, because there is a bug here.
Group all cells. When the page mouse moves, if the mouse is not over the group, the hint panel will be hidden.
In this way, all the settings are completed. If you have any questions and suggestions, please leave a message.
If you like the article, please share it with others with page link, thanks for your supporting! ❤
Note: Click here to download the completed RP file for this tutorial (RP 10 or up).
Well Joe @AxureBoutique, a technology writer and teacher, focuses on Axure prototype design and product design.


Leave a comment