

Axure Case: Data Transfer Across Pages with Repeater
Introduction
This article is a part of course Axure Full Course: Tutorial, Tips and Templates.
Axure can only use global variables to transfer data between pages. When only a few parameters need to be transferred across pages, we can set the corresponding global variables. However, if there are many data, it is not suitable to set its corresponding variables for each parameter. Now, we can implement it with only one variable.
Features to be Realized

After addition, deletion and edition data on one page, reflect the results on another page immediately.
How to Realize these Features
1. Save all data of a repeater through a global variable, mark the parameter position with [1], [2], [3], [4] etc, each row is placed in {} respectively.
2. When repeater loaded, the parameters between [1] and [2], [3] and [4]... are cropped from the variables, and are placed in the appropriate place in repeater table.
3. After the parameter assignment of the first row is completed, delete parameter between {}, repeat step 2, and assign the value with the second row of parameters between {}.
4. After addition, deletion and edition, extract the data of the repeater and modify it into the format of the initial variable. Then store it back into the variable.
Preview the completed prototype for this tutorial
Widgets and Interactions Setup

Make all the controls, and the repeater is used to make tables. Create Edit and Add dynamic panels.
1. Use a global variable to save all data, and then assign values to repeater table
Set global variables

T: Used to save temporary variables.
Staff: used to save the data of repeater table. Here I set up 8 arrays.
{(1)1(2)Tom(3)HRM(4)HRBP(5)Normal}{(1)2(2)Kate(3)Creative Design(4)UX Designer(5)Normal}{(1)3(2)Terry(3)Creative Design(4)UI Designer(5)Leave}{(1)4(2)Lily(3)HRM(4)Employee Relations (5)Normal}{(1)5(2)Mary(3)Technical(4)Front End Coder(5)Quit}{(1)6(2)Justin(3)Technical(4)Back End Coder(5)Quit}{(1)7(2)Eva(3)Technical(4)Test(5)Normal}{(1)8(2)Vicky(3)Creative Design(4)Visual Designer(5)Normal}
As in the above text, the corresponding parameter names are "Number, Name, Department, Position and State".
2. Repeater data assignment


When repeater loaded: copy the data of variable Staff to variable T, then slice the parameters of the first array from T and save them to the corresponding position of the repeater. You can add an ID sort to the repeater.


After the assignment of the first array is completed, delete it from the variable T, trigger the interaction when the repeater loaded, and use the second array for assignment.
2. Add, edit and delete data

Take "name" as an example. When "confirm" button is clicked, put the text value into the repeater table.


Where the data of ID is equal to the data + 1 in the ID label. When repeater item loaded, set the text of the ID label to the largest data in the ID column.
Save the data of the repeater into variables

1. First, drag and drop a text field updated staff to the canvas. When repeater item loaded, first set the updated staff to 0, and then set the updated staff to[[LVAR1]]{(1)[[Item.ID]](2)[[Item.Name]](3)[[Item.Department]](4)[[Item.Position]](5)[[Item.State]]}, Where LVAR1 is equal to the value of Updated Staff
2. Then assign the value to Staff.

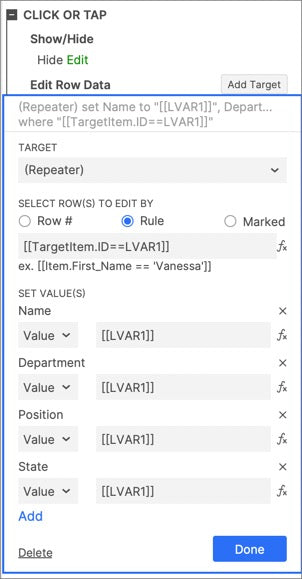
Save button in Edit Panel Interactions
The same applies to editing and deleting. When edit button is clicked, bring out the value of the corresponding row of the repeater to the text field or dropdown list. After editing, click the Save button to update the data.

When the checkbox is checked, the current row will be marked. When the delete button at the top is clicked, the marked rows are deleted.
3. Data Transfer Across Pages
The employee's name is shown on the current page, and its deletion will affect the previous page.

1. In the new page, just refer to the assignment method of the repeater above. Only the name is shown here.

2. When the close icon is clicked, the current row is marked and the warning dynamic panel is shown.

When the confirm button is clicked, hide the warning panel and delete the marked row.
4. Finally, let's try it
Add personnel, or modify or delete personnel on the "staff management" page.
Switch to the "Added personnel" page, and we can see the list of personnel names, which is consistent with the staff management page.
Delete the personnel on the "Added personnel" page, and then switch to the "staff management" page to see the data.
Switching back and forth without losing data.
In this way, all the settings are completed. If you have any questions and suggestions, please leave a message.
If you like the article, please share it with others with page link, thanks for your supporting! ❤
Note: Click here to download the completed RP file for this tutorial (RP 10 or up).
Well Joe @AxureBoutique, a technical writer and teacher, focuses on Axure prototype design and product design.


Hi there,
Great concept, thanks for creating and sharing!
I found problems with scaling this – once I got to 15-20 items, the loop (continually going back to Loaded from Item Loaded) seemed to add too many instances of the rows. In turn this stopped the “Staff” variable being updated properly, so the variable can’t be transported into other pages – they go blank.
I have partly (?) gotten around this by adding a “counter” to Item Loaded, but still gets overloaded with a large volume and slow to load my sample data set of 150+ items. Happy to share if you want to get in touch!
Best, Ian.
Leave a comment