

Axure Tutorial: Grid Style Lottery Drawing Prototype
Introduction
Random function is a commonly used function in Axure, which is often used in verification code, lottery and other cases. Next, let's learn how to make a high fidelity grid lottery prototype. The prototype is mainly made by using the repeater and random function. The lottery is realized by filling in the repeater table or copying the excel table to the repeater table.
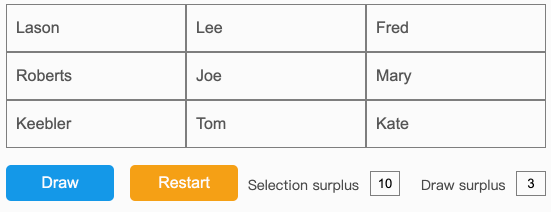
Preview the completed prototype for this tutorial
Features to be Realized
Thoughts on How to Realize
1. Constantly switch between selected and unselected when both Selection surplus and Draw surplus are greater than 0. Through the Trigger event to loop.
2. Calculate and pass randomly selected items by adding a new repeater. Add a filter to the new repeater to filter out the items that were not selected last time, and then randomly select the remaining items, and then pass the value back to the original repeater.
Widgets Setup


1. Add a repeater and set it to Wrap and Items per col to 3, you can change as needed. Name it Left.

2. Set its data as 4 columns, and the column names are: No, Name, Selected, Winner. Set the data default value of the selected column to - 1 (Unselected), and leave the winner column blank.

3. Copy the repeater Left, name the new repeater Right, and delete the winner column. Since Right repeater is only used for data calculation and transmission, it is hidden.

· Drag a Restart button.
· Drag a Draw Surplus label and a text field.
· Drag a Selected Item label and a Random Number to receive data.
· Drag Complete notice texts into the canvas and hide it.
Name these widgets according to their text and meaning.
Interactions Setup

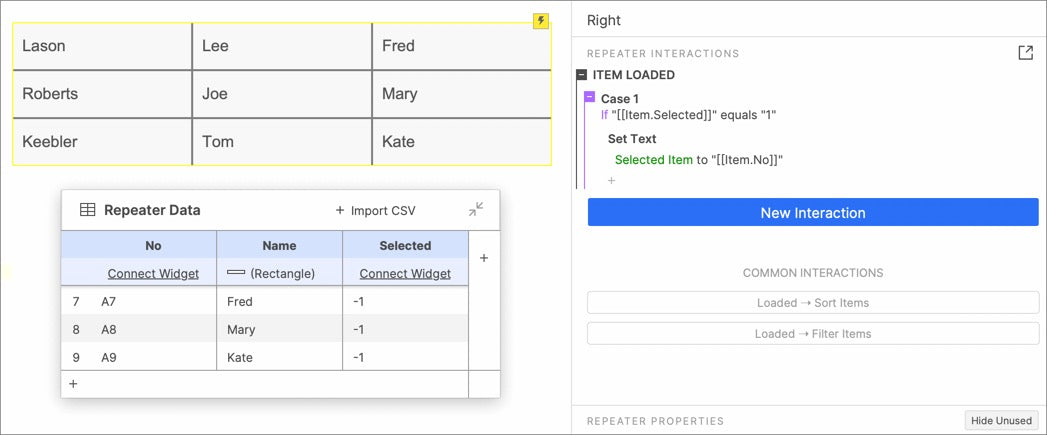
2. When each item of the right repeater is loaded, if item.Selected equals 1. Set the text of selected item to item.No of Right repeater. The value of this label is mainly used to pass data.

3. When the draw button is clicked, the following actions are performed:
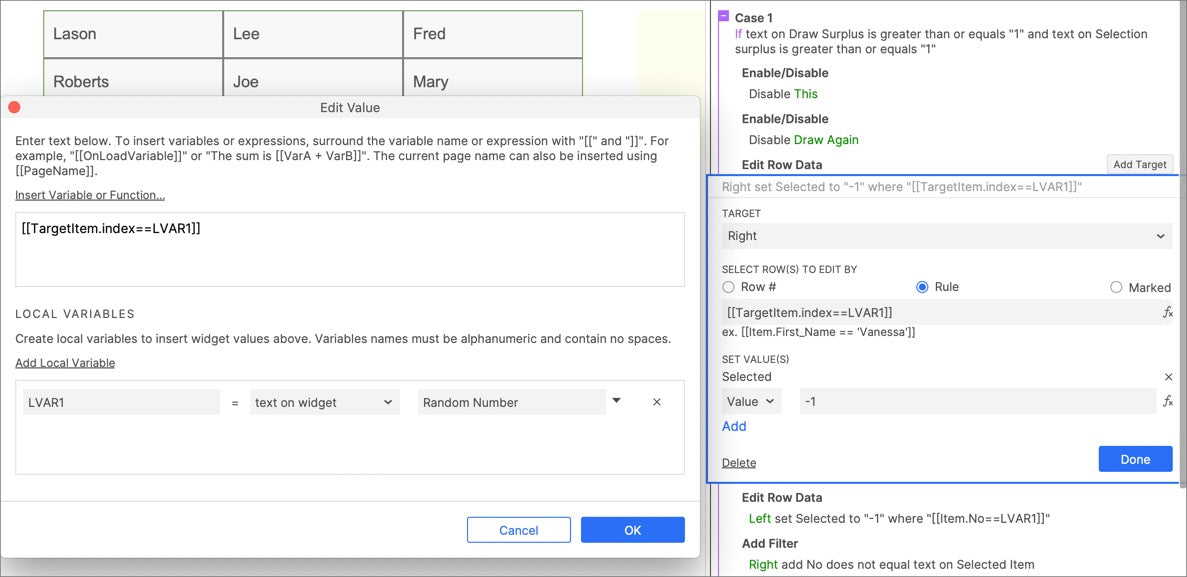
· Change the last selected item of the Right repeater to unselected(-1).

· Change the data in the selected column of the left repeater to unselected (- 1), when the data in the no column is the same as the selected item label text.

· Add a filter to the right repeater to filter out the last unselected items.

· Calculate randomly selected items. Store its text on the random number tag. Here you need to use the visible items of the right repeater.

· Then set the value of the selected column of the right repeater to 1, When the index of its row is equal to the value of the random number tag.
· After 100ms, reduce the value of Selection Suplus by - 1.
· Fire Click event on Draw button to loop.

4. When the text in the Selection Surplus text field changes, if the text is equal to 0, the last round of drawing is completed, Reduce the value of Draw Surplus by - 1; Delete the response row in the right repeater; change the value of the winner column of the response row in the left repeater to 1.

5. When the text of the Draw Plus text field changes, if the text is not equal to 0, change the Draw button to the Draw Again state; Enable draw again; Hide the complete notice. Otherwise, show the complete notice.

6. When Draw Again button clicked , set the Selection Surplus to 20 and fire Click event on Draw button to loop.
In this way, all the settings are completed. If you have any questions and suggestions, please leave a message.
If you like the article, please share it with others with page link, thanks for your supporting! ❤
Note: Click here to download the completed RP file for this tutorial (RP 10 or up).
Well Joe @AxureBoutique, a technical writer and teacher, focuses on Axure prototype design and product design.


Leave a comment