Axure Tutorial - Transfer - Repeater Advanced Tutorial
Introduction
Shuttle box is a commonly used selector. It moves data in the left and right list boxes in a very intuitive way to realize multiple selection of data.
Features to be Realized
1. Select the items on the left and click the right arrow to move the items on the left to the right;
2. Select the items on the right and click the left arrow to move the items on the right to the left.
How to Realize these Features
2. Moving items on the right to the left is a similar principle, but the opposite.

Preview the completed prototype for this tutorial
Widgets Setup
1. Drag 2 rectangles, 2 triangles, and 2 labels into the canvas. And adjust the size and style.

2. Drag 2 repeaters to the canvas and set the data. The repeater on the left is a column filled with names data, and the column name is Name. The data table of the repeater on the right also has only one column, and the column name is also Name.

3. Double click the repeater, select the rectangle, and name it List item left. Set selected style.
Interactions Setup
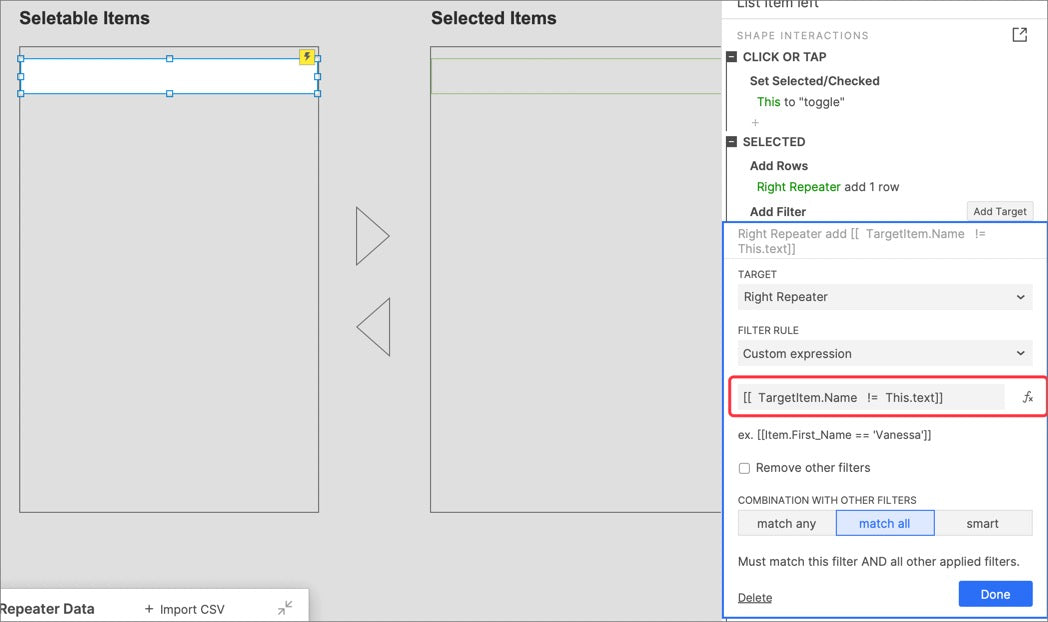
1.When the rectangle is selected, the repeater on the right adds a row, and the added column data is the text of the current rectangle.
2. Meanwhile, a filter [[TargetiIem.Name ! = This. text]] is added to the column on the right repeater, which means that the data on the right column is not equal to the text of the current rectangle, and mark the current row.
3 When the rectangle is unselected, the repeater on the right delete a row, and the deleted column data is the text of the current rectangle.

4. Click the triangle on the right. Set interaction when Clicked: remove all filters and delete marked rows.


5. In the same way, set the interaction of the right rectangle and the left triangle.
In this way, all the settings are completed. If you have any questions and suggestions, please leave a message.
If you like the article, please share it with others with page link, thanks for your supporting! ❤
Note: Click here to download the completed RP file for this tutorial (RP 10 or up).
Well Joe @AxureBoutique, a technical writer and teacher, focuses on Axure prototype design and product design.


Leave a comment