

Axure Advanced Tutorial: Simulate the Effect of Dragging the Selection Rectangle
Introduction
Dragging and dropping a selection rectangle with the mouse is a common operation. In Axure, you can perfectly simulate the effect.
Today, let's learn how to make it.
Preview
First, let's preview the effect to be achieved. As you can see, you can drag the mouse to draw the selection rectangle in four directions at will, and when the selection rectangle touches the red rectangle, the red rectangle shows the contact effect of the blue border, and when the selection rectangle leaves the red rectangle, the blue border disappears.
Making ideas
1. Let's make it. First, let's organize our thoughts. Since page interaction does not support drag interaction events, let's add a blank rectangle to be used as a drag-and-drop canvas.
2. The selection rectangle can be simulated by a rectangle whose size and position change constantly.
3. When dragging, we need to record the X and Y values of the mouse at the beginning of dragging, and then use it to calculate the dragging distance. We can record it separately through the text values of two rectangles.
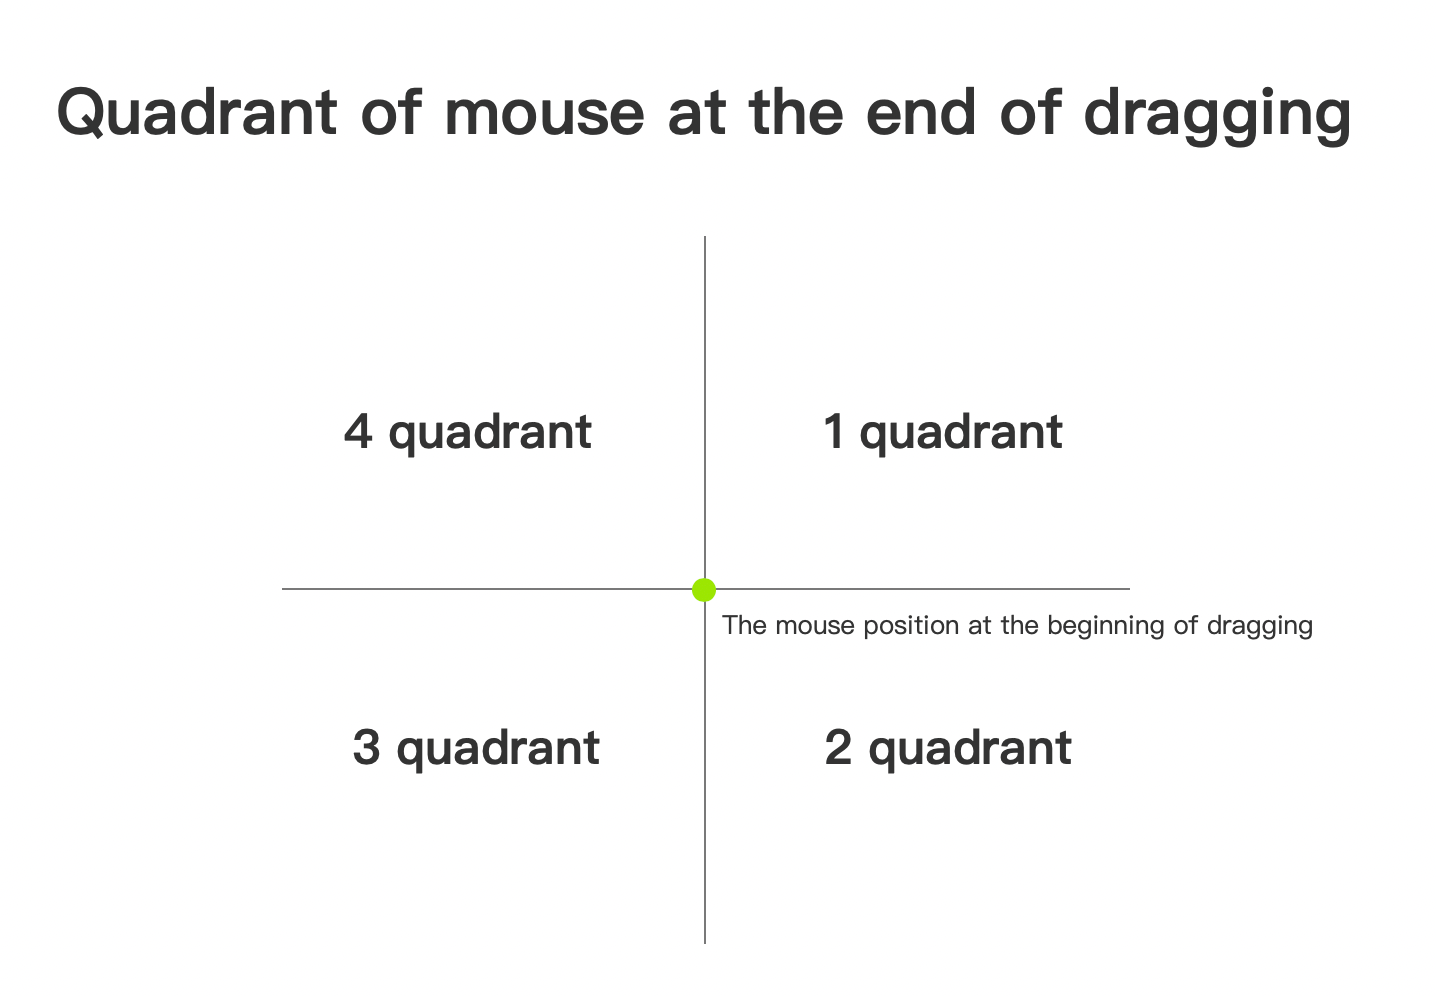
4. When dragging, we also need to record the direction of dragging, because the calculation of size and position of the selection rectangle in different directions is different. We can think of it as a coordinate axis with four quadrants. Use the mouse end point to determine which quadrant it is in.
Widgets Setup
First, drag in a blank rectangle as a canvas, and then lock it to avoid misuse.
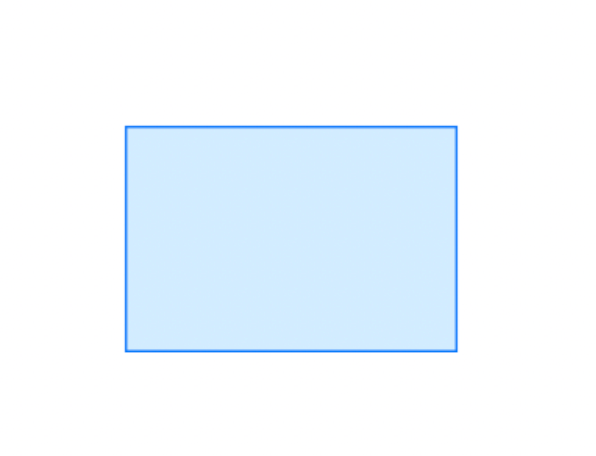
Then drag in a rectangle as a selection rectangle when dragging, change its style, and name it Selection Rectangle. Hide it.
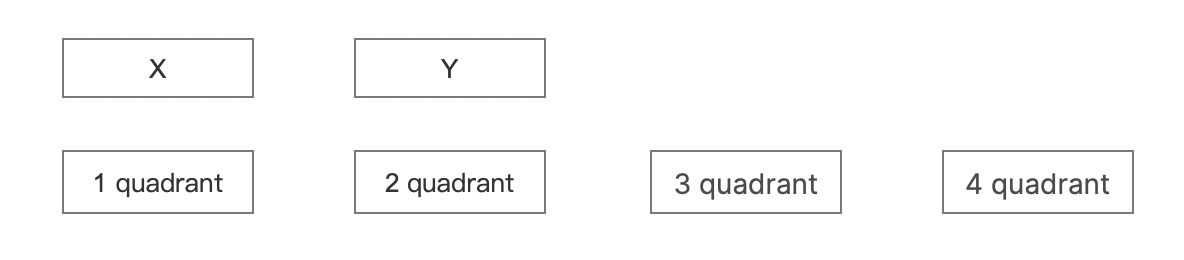
Then drag in six rectangles for recording values, named X, Y, quadrant 1, quadrant 2, quadrant 3, and quadrant 4, respectively.
Set an selection group and selection style for all four quadrant buttons, since only 1 quadrant button can be selected at a time.
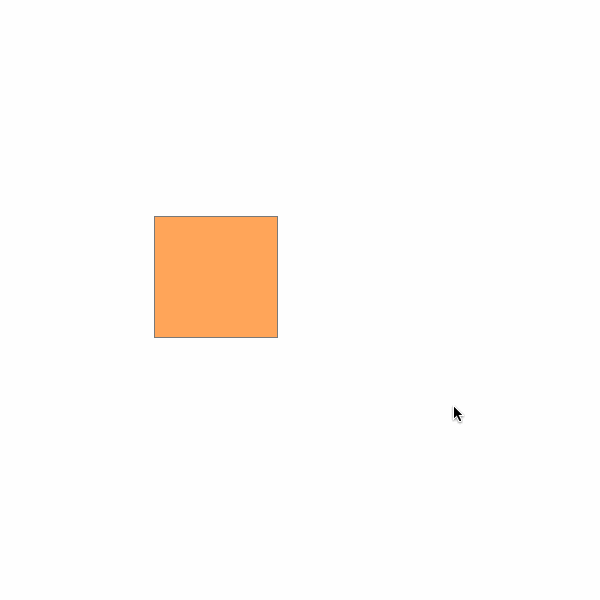
Then drag in a rectangle, name it Selectable rectangle, and set an error style for it. We use the error style to represent the touch interaction of the selection rectangle when selection rectangle touches it.
Interactions Setup
After the widgets are made, let's set up the interactions.
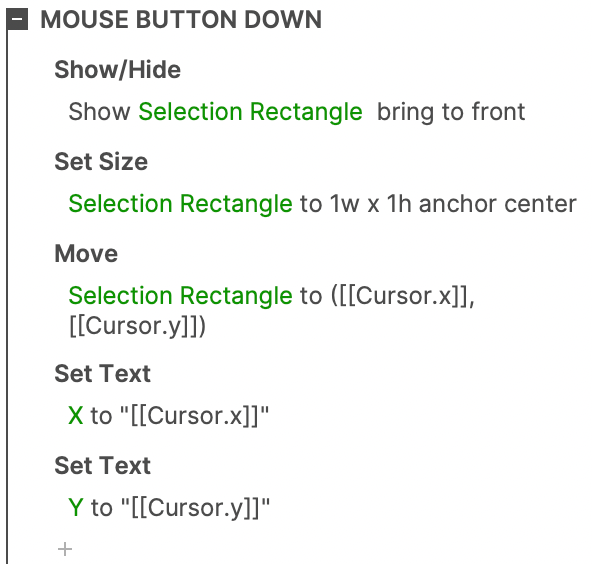
Canvas Interactions when the Mouse Button Down
When the mouse is pressed, we need to set it like this:
1. First show the selection rectangle and bring it to top, then set the selection rectangle size to minimum (1,1), move the selection rectangle to the position where the mouse is [[Cursor.x, Cursor.y]], then set the text and record the initial position of the mouse [[Cursor.x, Cursor.y]] into X, and Y.
Canvas Interactions when the Mouse Move
Then set the interaction when the mouse move, i.e. when dragging.
We need to determine which quadrant the mouse was in when it was dragged. This requires calculating the position of the mouse at the time of dragging and the position of the mouse when it was first pressed, and determining whether is positive or negative, to determine which quadrant it was in.
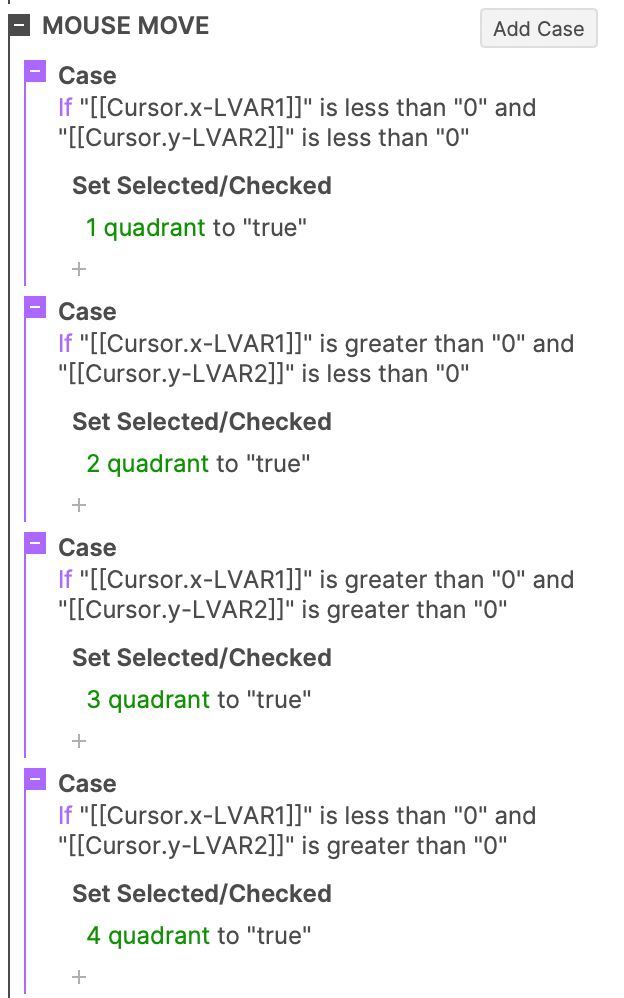
As shown above, the temporary variables represent the saved X and Y values. If the difference between the [[Cursor.x]] value and the X saved value is less than 0, and the difference between the [[Cursor.y]] value and the Y saved value is less than 0, then it is the first quadrant. Select the component in quadrant 1. And so on. Other conditions and actions are set in this way.
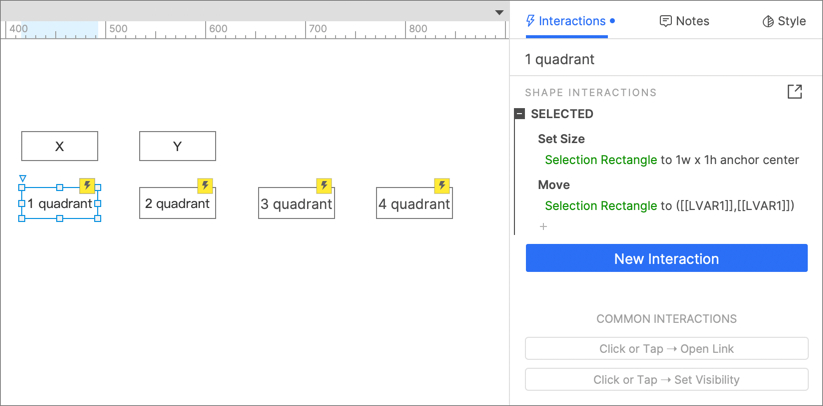
Then, we need to set the interaction when the quadrant buttons are selected. We need to reset the size of the selection rectangle to (1, 1) and the position to the value saved for X, Y. This is so that no position and size errors occur in the selection rectangle when the quadrant is changed.
Back to the canvas interaction, we need to continue to set the interaction when the mouse move.
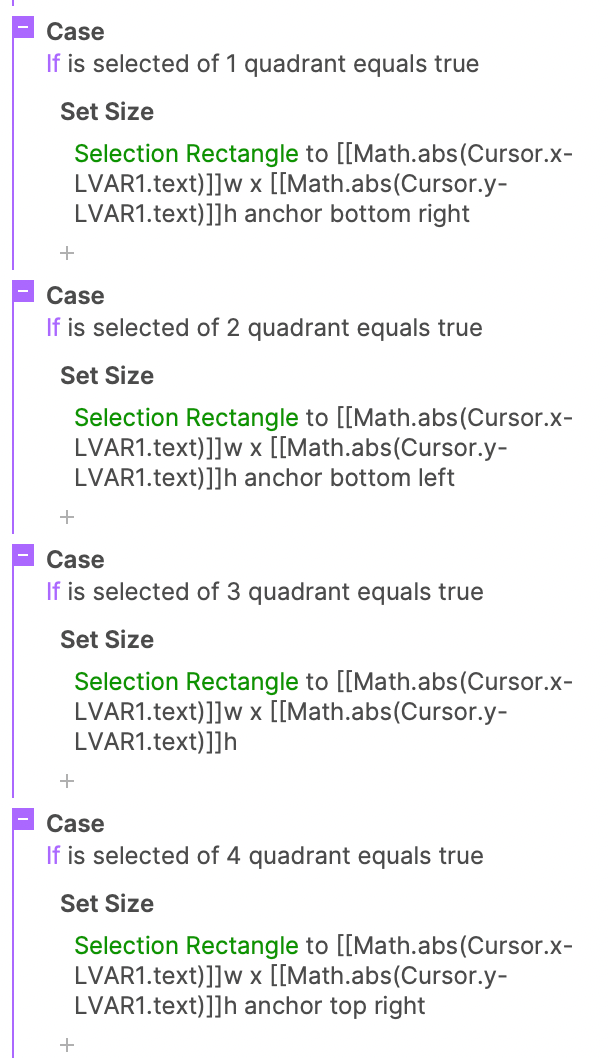
If quadrant 1 is selected, set the size width of the selection rectangle to [[Math.abs(Cursor.x-LVAR1.text)]], which is the absolute value of the difference between the cursor x value and the X saved text, and set the size height of the selection rectangle to [[Math.abs(Cursor.y-LVAR1.text)]], which is the absolute value of the difference between the cursor y value and the Y saved value. Also set the anchor point to the lower right corner.
If quadrant 2 is selected, copy the interaction of quadrant 1. Also set the anchor point to the lower left corner.
If quadrant 3 is selected, the interaction of quadrant 1 is copied. At the same time, set the anchor point to the upper left corner.
If quadrant 4 is selected, the interaction of quadrant 1 is copied. At the same time, set the anchor point to the upper right corner.
Interactions when the mouse button up
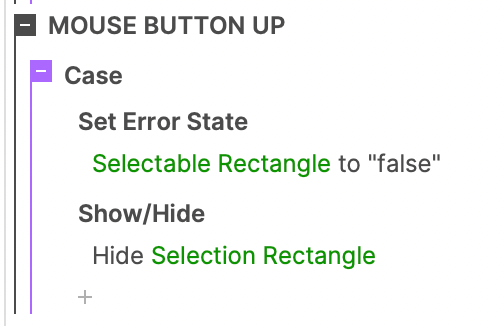
Then we set the interaction when the mouse button up. Here you need to set the error state of the Selectable Rectangle
Set the error state of the Selectable Rectangle to false when the mouse button up, and then hide the selection rectangle.
Then we also need to set the interaction of the Selection Rectangle.
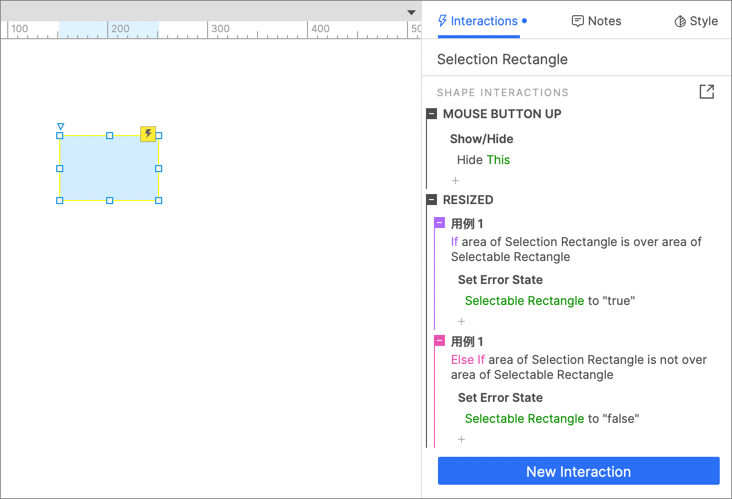
When the mouse button up, it needs to be set to hide the This widget. This is because when dragging and dropping, if the mouse touches this widget, it needs to hide itself.
When the size changes, you need to add a condition to set the error state of the Selectable Rectangle to true if the Selection Rectangle area is over the Selectable Rectangle
If the Selection Rectangle area is not over the Selectable Rectangle, set the error state of the Selectable Rectangle to false.
Finally, copy the Mouse Move event to the Selectable Rectangle and Selection Rectangle, to set the interaction when the Selection Rectangle touches them
Preview the Prototype
When the setting is finished, all rectangles that record the coordinates and quadrant selection states are hidden.
Preview the prototype, you can freely drag the selection rectangle and show the blue border when the selection rectangle touches the Selectable Rectangle, and hide the blue border if it does not touch the Selectable Rectangle.
If you like the article, please share it with others with page link, thanks for your supporting!
Note: Click here to download the completed RP file for this tutorial (RP 10 or up).
Well Joe @AxureBoutique, a technology writer and teacher, focuses on Axure prototype design and product design.


Leave a comment